brittni schroeder
BLOG
Brittni Schroeder Coaching
HOW TO CHANGE THE FONT
IN YOUR INSTAGRAM BIO
Your Instagram bio is prime real estate. It’s one of the first things people see when they land on your profile, and it can either encourage someone to stick around (and click!) or keep scrolling. As a coach, entrepreneur, or service-based business owner, your bio should clearly communicate who you help, what you offer, and why someone should work with you. Plus, Instagram’s features give you plenty of opportunities to create a strong first impression.
Have you ever wondered how some users have unique, eye-catching fonts in their bios? I started googling away, and I found just what I was looking for — and now I’m going to share it with you. Read on to find out how to change the font in your Instagram bio.
VISITING LINGO JAM
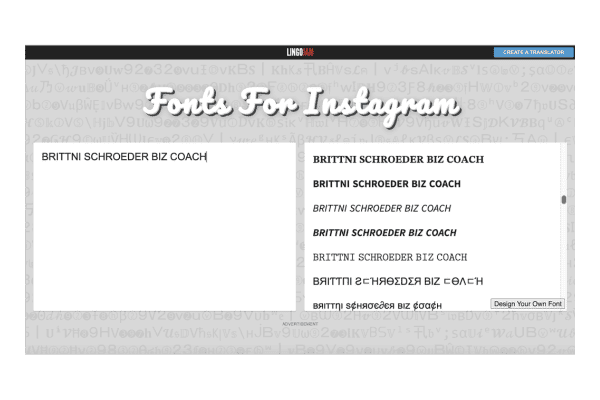
First, head on over to the text generator website Lingo Jam. Lingo Jam is a free online website that offers a wide range of font options to choose from.
TYPING IN YOUR DESIRED TEXT
Once you’re on the Lingo Jam website, you’ll see two text boxes. One will be the place to input your desired text, and the other will output the text in the available fonts. It can be your name, your title, or a catchy phrase.
CHOOSING YOUR FONT
Some of the fonts are minimal, while others are script fonts with emojis and different design elements. Once you’ve decided on your desired font, select the font and copy (Command+C or Ctrl+C) the entire converted phrase.
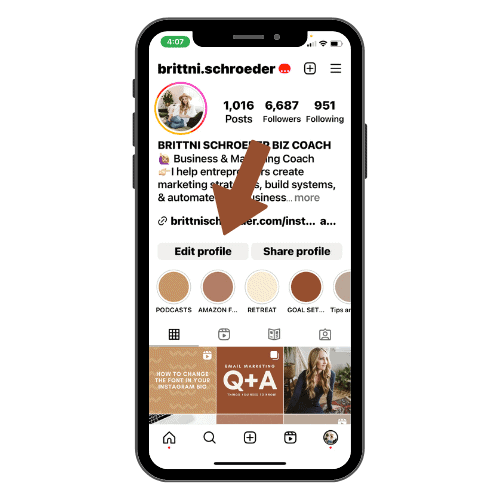
UPDATING YOUR INSTAGRAM BIO
Now it’s time to head on over to the Instagram app. Open your profile, and tap the “Edit Profile” button. In the bio section, delete your existing text and paste (Command+V or Ctrl+V) the newly copied font style from Lingo Jam. Take a moment to review, and make any needed adjustments to ensure the formatting looks just right.
ADDING A TEXT SYMBOL
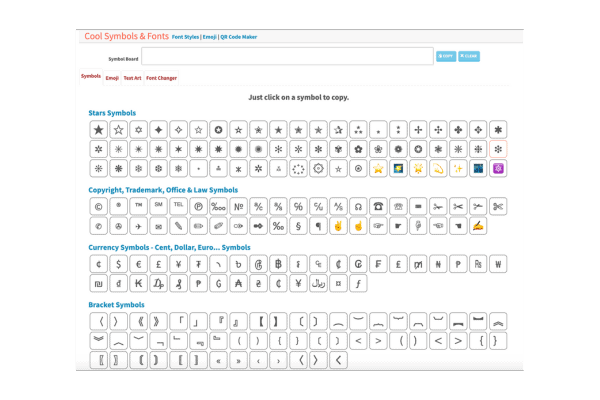
If you want to add something fun and unique to your name or bio—beyond the standard emoji—a great option is to use text symbols. These can help your profile stand out in search results and catch the eye of someone scrolling through Instagram. Head over to a text symbol generator (here’s a great library of text symbols) and browse different options. Once you find something you like, simply copy and paste it into your profile.
ADDING TO YOUR INSTAGRAM BIO
I like to paste my bio into the Notes app on my laptop and then copy and paste it into my Instagram. The Notes app allows you to add line breaks and paragraphs — if you try doing that in the Instagram app, it won’t work.
When writing your Instagram bio, make sure to include your first and last name, your title, your location (if relevant), any other interesting facts, and a call to action.
Lastly, make sure you fill in the URL field with the website you want your visitors to land on. You can add a link to your website, blog, lead magnet, or an online store. You could also create a webpage with several links or use a software like Linktree that allows you to add multiple links.
A FEW FINISHING TOUCHES
Your Instagram bio needs to quickly convey who you are and how you can help. Here’s a simple checklist to make sure your bio is doing its job:
- First and Last Name (especially important for searchability!)
- Your Title (Life Coach, Business Coach, Wellness Coach, etc.)
- Your Location (if your services are location-based or if you want to show where you’re from)
- An Interesting Fact or Personal Touch (this adds personality and helps build connection)
- A Clear Call to Action (What’s the next step? Book a discovery call? Download your free guide?)
- Your Website Link (Use this to drive traffic to your lead magnet, sales page, or an all-in-one link tool like Linktree)
Why This Matters: Instagram SEO and Attracting Ideal Clients
Instagram has become more of a search engine than ever before. That’s why optimizing your Name Field and Bio Section with relevant keywords is crucial. When someone searches for a Life Coach or Business Mentor in the search bar, Instagram pulls from the text in your Name Field—so be strategic! Adding keywords like Life Coach | Career Strategist to your name increases your chances of appearing in search results.
This is also why including a clear call to action and link is so important. You want to make it easy for your followers (and potential clients) to take the next step—whether that’s joining your email list, booking a discovery call, or purchasing your digital product.
SAVING YOUR BIO
Once you’re happy with the way the text, fonts, and symbols look, tap the “Save” button to update your profile. Bam! Now your Instagram is transformed with a unique new font.
WARNING
Unlike your username, Instagram will only let you change your name twice in 14 days, so keep that in mind before you hit “Save.” Keep in mind that some cursive fonts may be hard to read on a mobile device.
Play around with different fonts and symbols and create a bio that’s cohesive with your brand and reflects your personality. By making these simple changes, you can add personalization and stand out from your competition.