HOW TO CREATE A STUNNING LANDING PAGE IN FLODESK

How to Create a Stunning Landing Page With Flodesk

If you’re a business owner, growing your email list should be a high priority on your list of marketing strategies. In order to capture an email, you have to have a landing page. Creating a captivating landing page can be the difference between capturing potential customers and losing them to your competition. I use and love Flodesk for my email marketing. With the help of Flodesk, a user-friendly email marketing and design platform, you can easily create a stunning landing page that not only engages your audience but also converts visitors into loyal subscribers or customers. In this guide, we’ll walk you through the step-by-step process of how to create a stunning landing page with Flodesk.

Before You Begin. What Is Flodesk?

Flodesk is an all-in-one email marketing platform that stands out from the competition due to its visually appealing and user-friendly features. It allows you to create beautiful emails and landing pages with ease, even if you have no prior design experience. It’s the perfect solution for small businesses, bloggers, and entrepreneurs who want to make a lasting impression on their audience.

Before diving into creating your landing page, it’s crucial to have a clear understanding of your goals, target audience, and the message you want to convey. Start by defining:

  • Your Objective: What is the primary objective of your landing page? Are you looking to capture email subscribers, promote a product, or provide information?
  • Target Audience: Who is your ideal audience? Knowing your audience’s preferences and interests will help you tailor your landing page effectively.
  • Clear and Concise Message: What solution or transformation are you offering your ideal audience? Are you speaking to their pain points? What do you want your visitors to know or do after visiting your landing page? Your message should be clear and concise.

Once you’ve outlined these essentials, you’re ready to start building your Flodesk landing page.

Step 1: Sign in to Flodesk

First, ensure that you have a Flodesk account. If you don’t have one yet, sign up for an account and log in. If you want to try it out, you can use my 50% discount code HERE.

Step 2: Create a New Landing Page

  • Once you’re logged into your Flodesk account, click on the Forms tab on the left-hand sidebar.
  • Click the + New Form button.
  • You can either start from scratch or choose from a template. If you’re new to this, selecting a template is a great idea.

If this is your first time creating a landing page, Flodesk offers a variety of predesigned templates that cater to different purposes, whether it’s collecting email subscribers, promoting a product, or registering for an event. Choose a template that aligns with your goal, and you can customize it later to suit your branding.


Step 3: Customize Your Landing Page

Customizing your landing page is where the creative fun begins. Here’s how you can make your page uniquely yours:

Change the Layout

  • Click on any element to select and modify it. You can easily drag and drop elements to rearrange them.
  • If you want to change the entire layout of your landing page, use the Change layout option. This lets you choose from a variety of column options for your content.

Edit Text and Images

  • Double-click any text or image to edit it. You can change the fonts, colors, and styles to match your brand identity.
  • To replace an image, click on it and upload your own by clicking Change image.

Branding and Colors

  • You can edit the colors and fonts used on your landing page under the Design tab. Make sure to maintain a consistent look and feel with your brand.

Form Fields

  • Customize the form fields to gather the information you need. Flodesk offers a variety of field types, such as email, name, and more.

Call to Action (CTA)

  • Create a compelling call to action button to encourage visitors to take the desired action. You can edit the CTA button text, link, and design.

Mobile Optimization

  • Ensure that your landing page looks good on mobile devices by switching to the mobile view and making adjustments as needed.


Step 4: Set Up Form Settings

The next step is to configure the form settings. These settings determine how the data you collect is managed and stored. Here’s how to do it:

  • Click on the Form tab.
  • Configure your form settings, including the submission success message, where the data is stored, and the tags assigned to subscribers to segments.


Step 5: Publish Your Landing Page

Once you’ve customized your landing page to your liking, it’s time to publish it. Here’s how:

  • Click on the Publish button in the top-right corner.
  • You have three options: Embed, Share Link, and Direct link. Choose the one that best suits your needs.
    • Embed: If you want to integrate the landing page into your website or blog, use the embed code provided.
  • Share Link: You can share the landing page via a unique link.
  • Direct link: This link allows you to redirect your subscribers to a specific page after they submit the form.


Step 6: Test and Preview

Before promoting your landing page, it’s crucial to test it thoroughly to ensure that everything is functioning as intended. Here’s how to do it:

  • Click on the View your from live button to see how your landing page will look to visitors.
  • Fill out the form to test its functionality and check if you receive a confirmation email (if you’ve set up an email confirmation).


Step 7: Promote Your Landing Page

Your landing page is now ready for action, but it won’t do much good if no one sees it. Here are some ways to promote your landing page:

  • Share It on Social Media: Use your social media platforms to promote your landing page. You can create posts and stories or even run paid ads.
  • Email Marketing: If you’re using Flodesk for email marketing, send out an email campaign to your existing subscribers, directing them to your landing page.
  • Website Integration: Embed your landing page on your website or blog, ensuring it’s easily accessible to your website visitors.
  • Collaborate With Others: Consider partnering with other brands or influencers in your niche to promote your landing page to their audience.
  • Run Paid Ads: If your budget allows, consider running paid advertising campaigns on platforms like Facebook, Instagram, or Google Ads to drive traffic to your landing page.


Step 8: Analyze and Optimize

After your landing page has been live for a while, it’s essential to analyze its performance. Flodesk provides you with analytics to understand how your landing page is doing. Pay attention to metrics like conversion rate, bounce rate, and the number of sign-ups. Use this data to make improvements and optimize your landing page for better results.

Creating a captivating landing page is no longer a daunting task, thanks to user-friendly platforms like Flodesk. With the steps outlined in this guide, you can craft a visually appealing and effective landing page that not only captures your audience’s attention, but also encourages them to take the desired action — whether it’s subscribing to your email list, making a purchase, or registering for an event. Remember to continuously monitor your landing page’s performance and make adjustments as needed to ensure it remains engaging and effective. Good luck with your landing page creation journey!

HOW TO WRITE AN ABOUT ME PAGE

HOW TO WRITE AN ABOUT ME PAGE

Imagine meeting someone for the first time. They don’t know anything about you; they have never even heard your name. They ask: what do you do? You only have a brief moment, but you want to leave an impact. Why is it so easy to talk about our friends or our children, but when it comes to talking about ourselves we become tongue tied? We don’t know what to say or how to explain exactly what we do and who we are. Learning how to write an about me page will be one of the most essential parts of establishing your brand.

Your About Me page is one of the most important components of your branding. Not only is it the most viewed, but it’s the part that will make your audience fall in love with you and keep coming back for more. You want to be memorable and leave a striking impression. 

When writing your About page, remember that it isn’t intended for everyone. Hone in on your ideal audience. Although it is the “About Me” page, it’s really about them. Everything you produce should be about how you can serve and benefit them. You want to make sure when your ideal client lands on your site they know right away that you can help them get what they need. 

WHO YOU ARE

Show them why you are different. Use your own voice and show your personality. Try to avoid using third person and don’t be too formal. Make them fall in love with you through your story. Make sure it is relevant to what you are offering. Give your audience a reason to feel connected with you and what you want to do for them.  Imagine your perfect client landing on your page. This is your chance to wow them—to convince them you are exactly who they’ve been searching for.

YOU WILL FIX IT

Once they have connected with you they will want to know more about what you offer. It’s time to show them how you are you going to improve their business and life. Explain to them what sets you apart from your competition. Position yourself as an expert so they are confident and trust your brand. You want to give them something that is of value, something they are looking for.  Build confidence by assuring them that you are the one who can help them solve their problem. Identify their points of pain and give them solutions. This is a good time to tell them what you have done for others or what makes you qualified. Remember, it isn’t about your awesomeness, but about how you can use your awesomeness to help them.  

PHOTO

If there’s one place on your site to show off your pretty face, it’s your About Me page. Show your audience that you are human. They came to this page specifically to learn more about you. Posting pictures of yourself builds a connection. When they read your words, they picture you. This creates brand loyalty. 

CALL TO ACTION

Now that they know you, give them some direction. It is important to always include a call to action. Tell them where to go next. You can include recommendations to sign up for your newsletter list, download a free resource, follow you on social media, or schedule a consult or mini session.  Always ending with a call of action will keep your ideal clients moving forward. 

The most important things to remember is to use your own voice. If you are fun, creative, or sassy, let that come out in your writing. Remember that although it’s “About You,” it’s really for them. 


CLICK HERE TO GRAB YOUR "HOW TO WRITE AN
AMAZING ABOUT ME" GUIDE

HOW TO WRITE AN ABOUT ME PAGE

10 WAYS TO REPURPOSE YOUR CONTENT

10 WAYS TO REPURPOSE YOUR CONTENT

Creating content takes time and effort. Depending on where you post that piece of content, it could have a long lifespan or a short one. If you’re going to make the effort to create content, you might as well optimize its reach and lifespan, right? One piece of content has the power to reach the masses simply by repurposing it across a variety of platforms. It can be used in multiple ways, maximizing your marketing efforts. I am going to give you a step by step on 10 ways to repurpose your content and extend your reach.

WHERE TO START: HOW TO KEEP YOUR CONTENT ORGANIZED

First, let’s talk about keeping your content organized and easy to access. You’ve heard me talk about Airtable before, but it’s my favorite resource for keeping all my content organized. I use this platform to house all my blogs, podcasts, tutorials, affiliate links, and so much more. 

Here are some of my different databases that I’ve created in Airtable: 

  • Podcast: This is where I keep links to my podcasts and graphics, track where I’ve posted, and save other information. For example, I can publish an episode and post it on Instagram and several other platforms. I can view that I haven’t posted about a particular podcast for over a year, and I can decide to repurpose that great content and repost.
  • Blogs: The blog table works similar to my podcast table. I track where and when I’ve posted blogs. This ensures my content reaches all the platforms, and I can repurpose it if it’s still relevant after a certain amount of time.
  • Tutorials: Education is a huge part of my brand. Over the years, I’ve created many tutorials. Many of these tutorials are relevant and support the content I distribute. I’m constantly referencing and repurposing this content.
  • Affiliate Links: This where I list any affiliate with the accompanying links. This allows me to easily incorporate passive income into my content creation and repurposing.

HOW TO REPURPOSE CONTENT IN 10 WAYS

If you’ve never repurposed content, it might feel a little bit overwhelming at first.

However, once you start with organizing your content, the repurposing will be a piece of cake. Don’t feel like you have to do all or none when you first begin. Master one platform and then add another and another.

BLOG

When I first started my business, I was given the advice to write 50 blog posts. I didn’t really know what I was doing with SEO, but I got right to work with writing blog posts. As someone who has been in business for a few years now, I understand how powerful blogging can be and how it can help with your long-term growth. A blog is one piece of content that can be broken up into several pieces of content, so it’s a great place to start.

Once my blog is posted, I add the link to Airtable. I have an automation set up that sends an email to my virtual assistant to let her know a new blog is posted and she can share it on all different platforms.

PINTEREST

Another one of my favorite places to repurpose content is Pinterest. I start by creating graphics in Canva, writing an SEO-friendly Pinterest title and description using ChatGPT, and pinning it! I create about 10 different graphics for each blog post, tweaking the copy and graphics, and then schedule them to go out weekly using either Tailwind (paid) or Pinterest (free). It takes me around 30 minutes to pin each blog post.
INSTAGRAM

Instagram is my platform of choice and the one I spend the most time on. Once a blog is posted, I’ll share that I have a new post up in my stories and include the link. When it comes to creating posts for my feed, rather than sharing the entire blog post, I try breaking it into smaller pieces. 

For example, I could take this post and write an entire caption about how to organize your content to repurpose. I could then write another post about how to repurpose a blog for Pinterest.

FACEBOOK PAGES/FACEBOOK GROUPS

Similar to Instagram, I can repurpose my content for my Facebook page. There are a couple of different ways you can do that. You can connect your Facebook page to your Instagram through the app, or you can manually post or schedule using a scheduling app. I like to manually schedule my content on different platforms on different days. 

If you have a Facebook group, you have to manually schedule it or use a scheduling app. 

SHORT-FORM VIDEO CONTENT (INSTAGRAM REEL, FACEBOOK REEL, OR TIKTOK VIDEO)

Short-form video is quickly becoming all the rage. Just like we did in previous steps, after you’ve broken your blog into bite-sized pieces, think about which portions you can turn into a 15- to 60-second Instagram Reel, Facebook Reel, or TikTok video. Is there a bullet point or quote you can share? Can you create a list or steps that encourage your audience to save and share? After you create a video, don’t forget to share it on Pinterest.

Pro Tip: Before you hit publish, save the video to your camera roll to avoid the watermarks. If you use Instagram’s audio, the audio will not save, so keep that in mind. If you want to learn more about creating Reels check out my Rock The Reels course.

EMAIL/NEWSLETTER

Do you have an email list? If not, it’s definitely time to start. Did you know email has higher conversion rates than social media and search combined? Because the conversion rate is so much higher, it’s important to take this opportunity to repurpose your content in your email marketing. Take bullet points from your blog post or social media posts and incorporate them into your email marketing.  A good word count for newsletters is 200 words, or 20 lines of text, so your email doesn’t have to be elaborate or lengthy. The goal is to drive engagement through your CTA (call to action) or clicks. So you’ll want to capture the reader’s attention and lead them to a blog or video or wherever else you want to lead them. 

LINKEDIN/LINKEDIN NEWSLETTER

If you’re like me, you created a LinkedIn account after you graduated college and haven’t done a ton with it since. Don’t overlook this platform as another source to repurpose your content. Take your content from social media and create and schedule those posts. Keep in mind that the LinkedIn audience is a different audience than Instagram or TikTok, so keep things professional and relevant.

LinkedIn also has a newsletter feature that allows you to send out newsletters. This is different than your other email marketing platforms, because you don’t actually have your subscribers’ emails because the newsletters are sent via LinkedIn. With that being said, try to include calls to action that have readers opt-in to your other email/newsletter list so you can get their email.

GOOGLE MY BUSINESS

If you have a business, you need to make sure you’ve registered your business on Google my Business. This is a place potential clients will go to find your business and look at your reviews. Did you know you can also add content on Google My Business? Posting to Google My Business can help SEO efforts when you share relevant and engaging information. As a result, this can increase profile engagement and rankings. Repurposing your social media content on Google My Business is one more way to extend your reach.

PODCAST

Another great way to nurture your audiences is through a podcast. This is a convenient way for possible clients to consume your content. If you don’t have a podcast or aren’t quite ready to start one, find podcasts that you can be a guest on and speak about your expertise. Put together an email introducing yourself, and include a media kit that highlights your experience and expertise. There are lots of podcasts that are always looking for guests.

YOUTUBE

YouTube is a searchable platform similar to your blog and Pinterest. That means your content has a longer lifespan because it has a built-in search engine. If you’ve created short- or long-form videos, ensure that you reprise that content on YouTube. Take the time to learn how to find and optimize keywords, and incorporate those into the description of the video. 

If creating video isn’t in your wheelhouse but you have a podcast, many podcasting hosting softwares include features that allow you to automatically post your podcast to your YouTube channel.

LIVE WEBINARS

Last but definitely not least, test out the waters with a Facebook or Instagram Live. You’ve already outlined your content above — whether it be for a video, a podcast episode, or an email. So now it’s time to host a live session with the opportunity for Q&A from your audience. We highly recommend this approach when you’re repurposing content that feels extra-complicated. Sometimes talking through it with real-life examples can really captivate your audience.

There you have it: 10 ways to repurpose content for your audience while saving you time. And this only scratches the surface. There are so many more platforms in which you can repurpose content, such as X (formerly Twitter), Snapchat, guest posts, HARO, other blogs, freebies and so much more! It’s important to remember to emphasize quality over quantity. Take the time to create good-quality content and then blast it to the masses to maximize its reach.

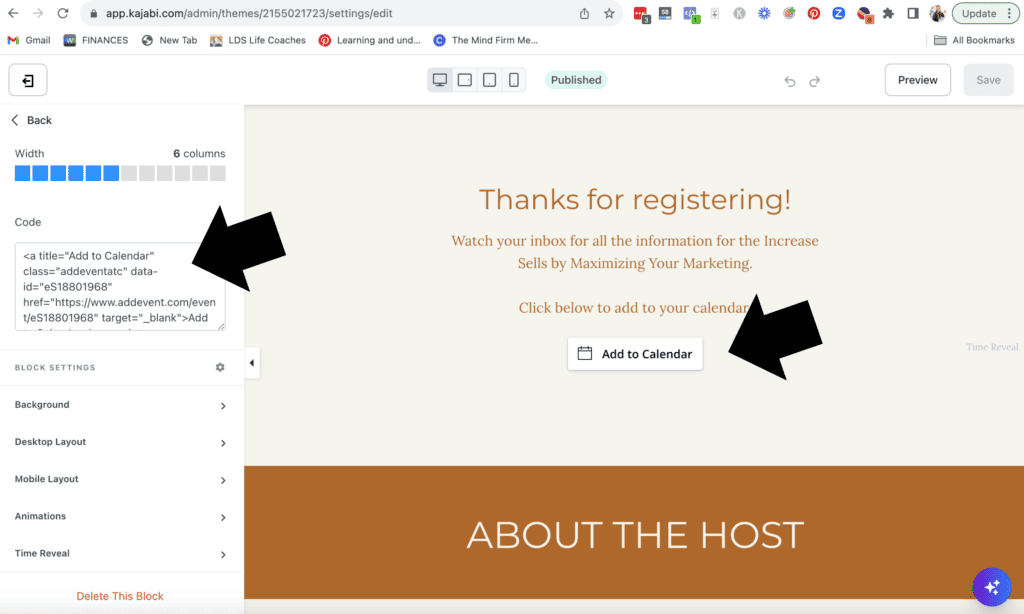
How to Add a Calendar Reminder to a Landing Page

Addevent is an awesome tool that allows you to integrate events into your website, including your landing page. In this comprehensive guide, I’ll walk you step-by-step through the process of how to add a calendar reminder to a landing page.

If you’re hosting a coaching call, a webinar, or any other event, you understand the struggle of getting attendees to show up. If you’re looking to increase user engagement and boost conversions, incorporating an event calendar can be a game-changer. The event calendar tool I use is Addevent. Addevent is an awesome tool that allows you to integrate events into your website, including your landing page. In this comprehensive guide, I’ll walk you step-by-step through the process of how to add a calendar reminder to a landing page.

Why Use Addevent on Your Landing Page?

Before we dive into the how, let’s briefly discuss why integrating Addevent into your landing page can be beneficial:

  • Convenience and Accessibility: One main benefit of adding calendar buttons is the convenience and accessibility they offer to potential attendees. By simply clicking on the button, users can effortlessly save the event details directly to their preferred digital calendars, such as Google Calendar, Outlook, or iCal. This feature eliminates the hassle of manually entering event information, reducing the chances of human error and ensuring accuracy. Attendees can easily access event reminders, locations, and other essential details from their calendars, increasing the likelihood of event attendance.
  • Reduce Attrition Rates: There’s an ongoing issue of registered attendees failing to show up for events—a significant challenge when you’re hosting conferences, webinars, workshops, or seminars. However, incorporating “add to calendar” buttons can help this issue. By providing attendees with a simple way to save the event to their calendars, you make it easier for them to keep track of the event and minimize the chances of forgetting or double-booking. This strategy significantly reduces attrition rates, increasing guest attendance and providing greater engagement from attendees.
  • Increase Attendance and Engagement: When attendees add an event to their calendars, they signal their intent to participate and engage with your organization. By integrating the “add to calendar” feature across your event promotion channels, including websites, email invitations, and social media posts, you can make it easier for potential attendees to commit to your event while reducing the risk of error. This increased commitment translates into higher attendance rates, ensuring a larger audience for your event. The more attendees you have, the greater the potential for building meaningful connections, generating leads, increasing sales, and driving business growth.

Now that we understand the advantages, let’s get started on the process of adding Addevent to your landing page.


Step 1: Sign Up for an Addevent Account

If you don’t already have an Addevent account, the first step is to sign up. It’s a straightforward process, and you can start with a free account to get familiar with the platform. 

Here’s what you need to do:

  • Go to the Addevent website.
  • Click on the “Sign Up” or “Get Started” button.
  • Follow the on-screen instructions to create your account. You’ll need to provide your email address and choose a password.

Once you’ve completed the registration, you’ll have access to your Addevent dashboard, where you can create and customize an event.


Step 2: Create Your Event

It’s time to create your event: 

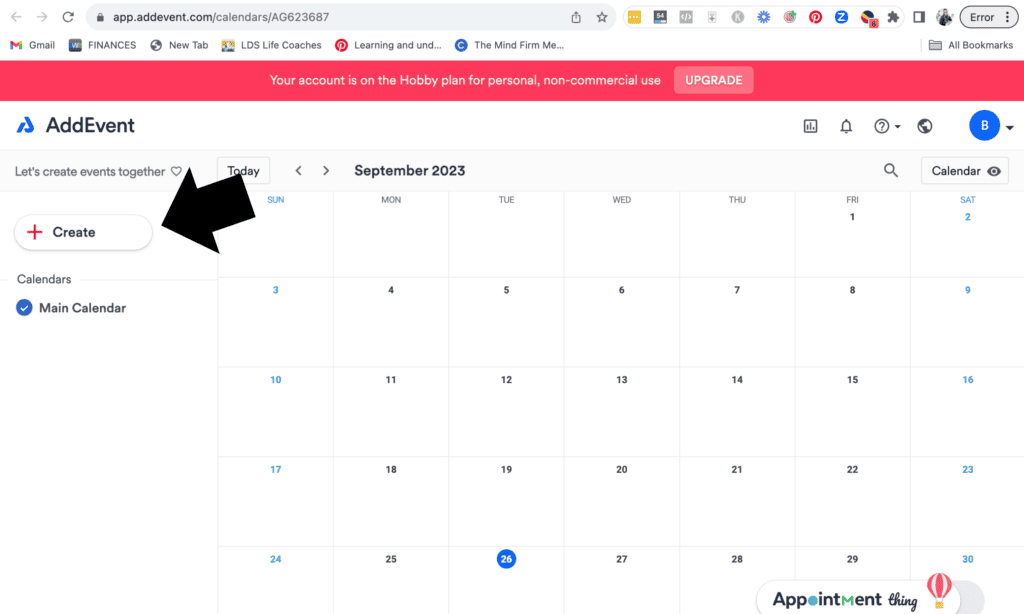
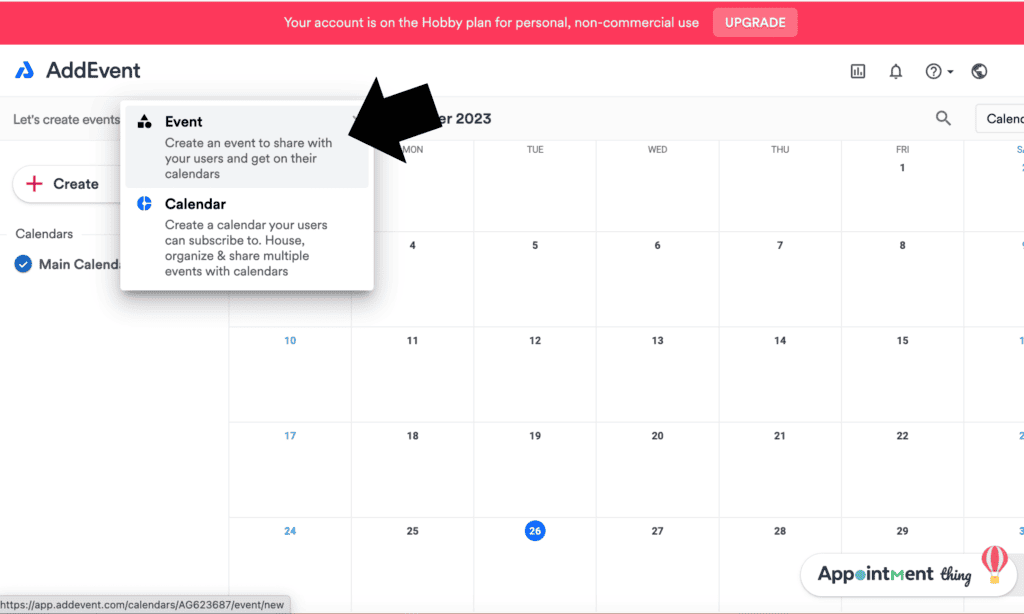
  • Once you’re logged in and have accessed your dashboard, click on the “Create Event” button.
How to Add a Calendar Reminder to a Landing Page
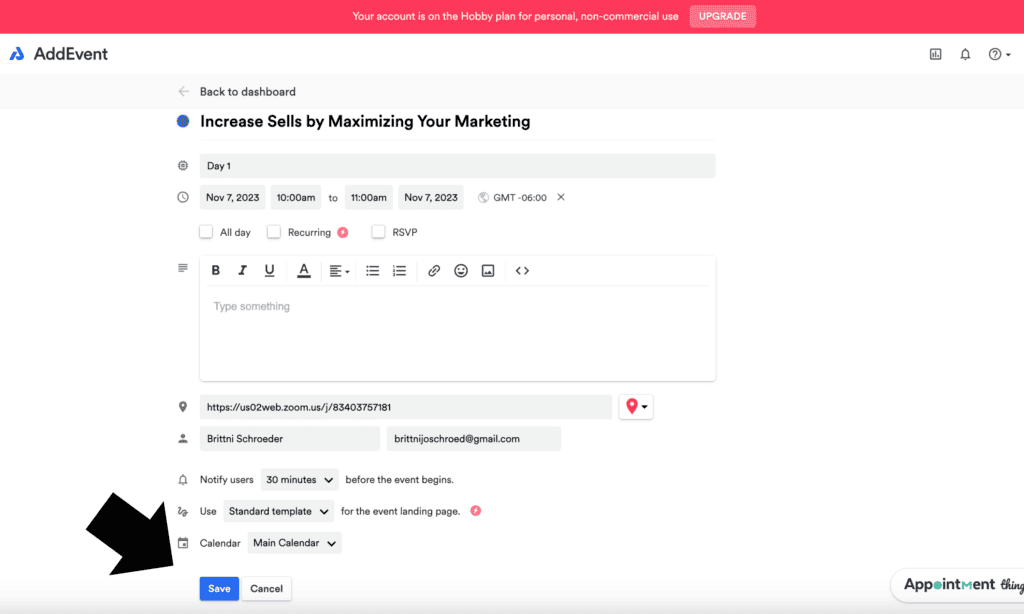
  • Fill in the event information, including the event title, date, time, location, and any additional details you want to include. Be as specific as possible to provide users with all the necessary information.

How to Add a Calendar Reminder to a Landing Page
  • Customization: The paid Addevent plan offers customization options that allow you to match the event’s appearance with your landing page’s design. You can choose colors, fonts, and sizes that complement your site’s aesthetics.
  • Save or Publish: Once you’ve filled in all the event details and customized the widget to your liking, you can choose to save it as a draft or publish it immediately.


Step 3: Generate the Embed Code

Now that your event is created and customized, it’s time to generate the embed code. This code will allow you to place the event widget on your landing page by following these steps:

  • From your event’s dashboard, click on the event you want to embed.
  • In the event’s details, click on the “Widget” tab.
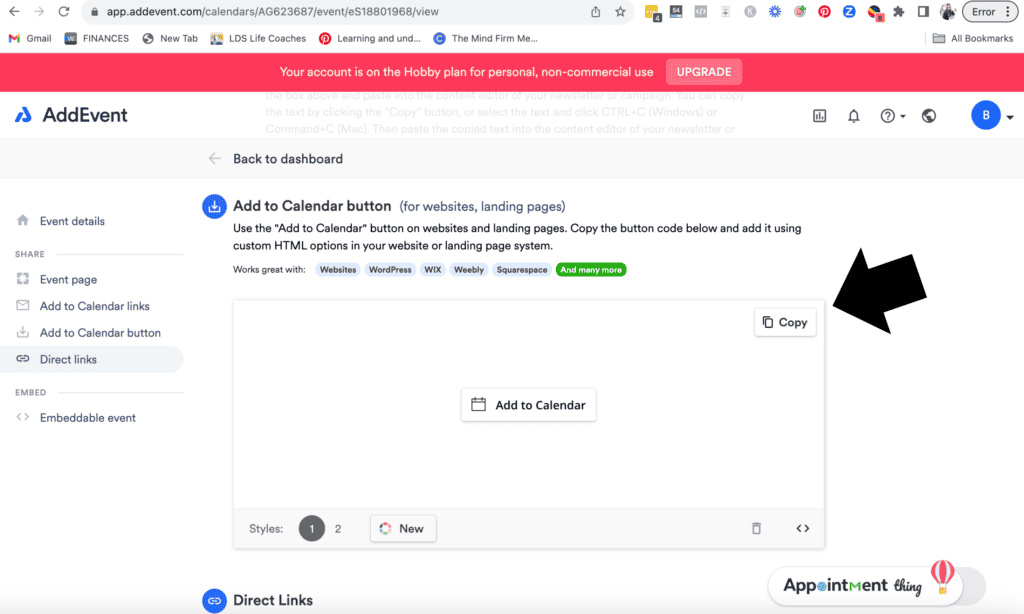
  • Generate Code: After customizing the widget, click the “Generate Code” button. Addevent will generate an HTML code snippet you can add to your landing page.
  • Copy the Code: Click on the code snippet to select it, and then copy it to your clipboard. You’ll need this code to embed the event on your landing page.

How to Add a Calendar Reminder to a Landing Page


Step 4: Add Addevent to Your Landing Page

Now that you have the embed code, it’s time to add your Addevent event to your landing page. The specific steps for this process may vary depending on your website builder or content management system (CMS). However, the general process involves editing the HTML of your landing page and pasting the code snippet you copied earlier.

Here are the general steps to add Addevent to your landing page:

  • Access Your Landing Page: Log in to your website builder, and access the landing page you want to edit.
  • Locate the section of your landing page where you want to add the event calendar.
  • Paste the Code: In the HTML editor, paste the Addevent code snippet you copied earlier. Make sure to place it where you want the event calendar to appear.
  • Save your changes, and update your landing page. This will apply the changes and make the event calendar visible to your visitors.

Step 5: Test Your Landing Page

After adding Addevent to your landing page, it’s crucial to test it to ensure everything is working correctly. Here’s what you should check:

  • Confirm that the event calendar appears as intended on your landing page. Verify that the colors and fonts match your site’s design.
  • Event Information: Click on the events within the calendar to ensure that all event details are displayed accurately.
  • Responsiveness: Check how the event calendar looks on various devices, including desktops, tablets, and smartphones. Ensure that it’s responsive and user-friendly on all screen sizes.

Once you have added the calendar reminder to your event landing page, now it’s time to promote, promote, promote. 

Creating an Annual Email Marketing Content Calendar

Creating an Annual Email Marketing Content Calendar

Brittni Schroeder Coaching

Creating An Annual Email
Marketing Content Calendar

Creating an Annual Email Marketing Content Calendar


Email marketing remains one of the most effective and personal ways to engage with your audience. However, successful email marketing requires careful planning and consistent effort. This is where an annual email marketing content calendar comes into play. In this blog, we’ll explore the importance of creating an annual email marketing content calendar for your email marketing campaigns and provide a step-by-step guide on how to create one that sets you up for success throughout the year.


Why You Need an Email Marketing Content Calendar

Before diving into the process of creating an annual email marketing content calendar, let’s understand why it’s crucial for your business.


Consistency is Key

Consistency is a fundamental aspect of email marketing success. Your subscribers expect to hear from you regularly, and a content calendar helps ensure that you send emails consistently. This, in turn, keeps your audience engaged and informed about your products, services, or updates — and it also builds the know, like, and trust factor.


Strategic Planning

A content calendar allows you to plan your email marketing campaigns strategically. You can align your emails with specific marketing goals, product launches, or seasonal promotions. This strategic approach helps you make the most of your email marketing efforts. When you’re strategic with your content, it allows you to align your content with your current offers.

Successful Collaborations

If you use collaborations to scale your business, having a content calendar helps organize and streamline collaboration. You can see what’s in the pipeline, plan tasks accordingly, and schedule collaborations with plenty of time.


Data-Driven Optimization

With a content calendar, you can analyze the performance of your email campaigns more effectively. By tracking open rates, click-through rates, and conversions for each email, you can tweak and improve your strategy over time, ensuring that your emails become increasingly effective.


Now that you understand the importance of an email marketing content calendar, let’s walk through the steps to create one.


Step 1: Define Your Goals and Objectives

Start by outlining your email marketing goals and objectives for the year. What do you want to achieve with your email campaigns? Common objectives include increasing sales, growing your subscriber list, enhancing brand awareness, and nurturing customer relationships. Clear goals will guide your content creation and help you measure success.


Step 2: Identify Key Dates and Events

Next, identify the key dates and events that will influence your email marketing throughout the year. These can include holidays, your birthday, product launches, industry events, and other significant milestones. Make a list of these dates in your calendar.


Step 3: Market Research

Perform regular market research by sending out questionnaires 2-3 times a year that ask your list to help you out and give you feedback on what they would like to see.


Step 4: Segment Your Audience

Understanding your audience is crucial for crafting effective email campaigns. Segment your email list based on factors like demographics, purchase history, and engagement level. This segmentation will enable you to tailor your content to specific audience segments and increase relevance.


Step 5: Plan Your Email Content

Now it’s time to plan the actual email content for each campaign. Consider the following when crafting your email content:

  • Content Categories. Determine the types of emails you’ll send. These may include promotional emails, newsletters, educational content, customer testimonials, and more.
  • Message and Value Proposition. What message do you want to convey in each email? What value are you providing to your subscribers? Your content should align with your goals and resonate with your audience.
  • Visuals and Design. Plan the visuals and design elements for your emails. Consistency in branding, imagery, and layout will help strengthen your brand identity.
  • Call to Action (CTA). Every email should have a clear and compelling CTA that guides the reader on what to do next, whether it’s making a purchase, signing up for a webinar, or downloading an e-book.

Step 6: Create Email Templates

Now that you have a clear plan for your email content, it’s time to create email templates. Consider the different emails that you send (podcast, blog, recipes, tutorials, etc.). Create templates that are relevant to those categories.


Step 7: Populate Your Calendar

Start populating your content calendar by filling in the details for each email campaign. Begin with the most critical campaigns, such as holiday promotions or product launches. Ensure that your emails are spaced out evenly to maintain consistency in your communication..


Step 8: Review and Adjust

Regularly review your email marketing content calendar to ensure that it aligns with your goals and objectives. Be prepared to adjust your schedule if unexpected opportunities or challenges arise throughout the year.


Step 9: Automate and Schedule

To streamline your email marketing efforts, consider using an email marketing platform that allows you to automate and schedule your campaigns. This will help ensure that your emails are sent at the right time, even when you’re not actively managing them.


Your email marketing content calendar should not be static. As you learn more about your audience and the effectiveness of your campaigns, be willing to adapt and evolve your strategy. Experiment with different content types, subject lines, and messaging to continuously improve your results.

Creating an annual email marketing content calendar is a critical step in achieving email marketing success. It helps you maintain consistency, plan strategically, allocate resources efficiently, and optimize your campaigns over time. By following the steps outlined in this guide and remaining flexible in your approach, you’ll be well-prepared to engage and nurture your audience throughout the year. Remember that email marketing is not just about sending messages; rather, it’s about building lasting relationships with your subscribers.

HOW TO GROW YOUR INSTAGRAM FOLLOWING

HOW TO GROW YOUR INSTAGRAM FOLLOWING

Brittni Schroeder Coaching

How to Grow Your Instagram Following

HOW TO GROW YOUR INSTAGRAM FOLLOWING

In today’s digital marketing age, Instagram has become a powerful platform for personal branding and business promotion. With over a billion active users, it’s an incredible tool for building a loyal audience and expanding your reach. Whether you’re an individual, a business, or an aspiring influencer, growing your Instagram following can significantly impact your online presence and goals. In this post, we’ll jump into actionable strategies that can help you organically increase your Instagram followers. You will get helpful tips on how to grow your Instagram following.


CRAFT A COMPELLING PROFILE

Your Instagram profile is the first impression you make on potential followers. I consider this the “first date,” so make sure your profile is a strong reflection of your brand.

Here are some helpful tips for doing just that:

  • Profile Picture: Use a clear and recognizable profile picture, ideally your brand logo or a professional headshot. People are loyal to people, not logos, so if you’re a solo entrepreneur, use a picture of yourself. Take my advice, and invest in a professional branding photo shoot. Imagery can be a very powerful tool when setting the standard as a professional.


  • Username: Keep it simple and reflective of your brand or name. Avoid complicated or lengthy usernames. If your business name is already being used, try to use a similar variation of your business name.


  • Bio: Craft a concise and engaging bio that highlights your identity, interests, and what you offer. You have only 150 characters to use, so use them wisely. Try incorporating emojis if they’re reflective of your brand.

    Remember to always include a call to action that tells your followers to click on the link and grab your freebie, schedule a consult, check out your website, etc.


  • Link: Utilize the link in your bio strategically, directing users to your website, blog, or a current promotion. Consider using a program like Linkt.ree, Tap Bio, or Shortby that allows you to create landing pages with several links.

CREATE HIGH-QUALITY CONTENT

The key to Instagram growth lies in the content you share. When your content is valuable, your followers will like, comment, save, and share your content — and this is where you’ll see massive growth.


Here’s how to make it compelling:


  • Visual Aesthetics: Maintain a consistent visual theme through colors, filters, and style to create a cohesive and recognizable feed. Create a branding board with your branding colors and fonts, and try to be consistent with those elements. Your goal is to create brand recognition. 

  • Quality Imagery: Use high-resolution images that are visually appealing and aligned with your brand. Incorporate branding photos, stock images, and graphics with your branding colors.

  • Variety: Mix up your content with a blend of images, videos, stories, reels, and carousel posts to keep your audience engaged.

  • Storytelling: Craft captions that tell a story, ask questions, or encourage engagement. Captions can be just as important as visuals. Use the tools that Instagram has to help with your storytelling.


ENGAGE OFTEN

Engagement is a two-way street on Instagram. Remember: If you want to get results on social media, you have to be social. Building a community involves interacting with your followers and others in ways like these:


  • Respond to Comments: Engage with your followers by responding to their comments promptly. Show genuine interest in their thoughts.

  • Initiate Conversations: Ask questions in your captions or stories to encourage discussions and connect with your audience. Be authentic and focus on building connections and relationships.  Be authentic, and don’t try to pitch or sell. Once you build a connection organically, selling will happen if they’re interested in your service or product.

  • Like and Comment: Interact with posts from accounts in your niche or your followers’ accounts. Meaningful comments can catch others’ attention. Include this in part of your workflow, make it a priority to engage often.

UTILIZE HASHTAG STRATEGIES

Hashtags are a very underutilized tool that leads users to your content. Use them effectively:


  • Relevance: Choose hashtags that are relevant to your content and niche. Mix popular, moderately popular, and niche-specific hashtags.

  • Branded Hashtags: Create a unique hashtag for your brand and encourage your followers to use it. It fosters a sense of community.

  • Research: Explore what hashtags your competitors or influencers in your niche are using.

  • Engage: Follow and engage with that hashtags that your ideal audience uses and follows.


COLLABORATE AND NETWORK

Collaborations can help you tap into new audiences and broaden your reach:


  • Influencer Collaborations: Partner with influencers and colleagues in your niche for shoutouts, takeovers, or joint campaigns.

  • Guest Features: Be a guest on podcasts, webinars, or Instagram Lives to introduce yourself to new audiences.

  • Engage With Peers: Network with accounts similar to yours. Genuine connections can lead to cross-promotion opportunities.

CONSISTENCY AND FREQUENCY

Regular posting keeps your audience engaged and informed:


  • Posting Schedule: Establish a consistent posting schedule that aligns with your audience’s online activity. Review your analytics, learn what day and time your audience is active, and post on those days and times. Decide how often and on what days you want to post, and be consistent.


  • Content Calendar: Plan and create content in advance to avoid last-minute rushes. Designate a day to plan and create your content. Be intentional with your content and prepare for any upcoming events ahead of time.


  • Story Updates: Regularly update your stories to provide real-time insights into your life or brand. Using stories is a great way to show your audience the behind the scenes. This uncurated view of your life helps people connect and build the know, like, and trust factor.


Growing your Instagram following is a journey that requires dedication, creativity, and a genuine connection with your audience. When you learn how to grow your Instagram following you will see growth in your business. By optimizing your profile, creating captivating content, engaging actively, and strategically using hashtags, you can expand your reach and make your mark on the platform. Remember, it’s not just about the numbers; rather it’s also about building a meaningful community around your brand or passion. Stay authentic, adapt to changes, and keep experimenting with different strategies to achieve sustainable growth on Instagram.

A Step-by-Step Guide to Creating a Coaching Program

A Step-by-Step Guide to Creating a Coaching Program

Brittni Schroeder Coaching

A Step-by-Step Guide to
Creating a Coaching Program

A Step-by-Step Guide to Creating a Coaching Program

In today’s fast-paced and competitive world, many people are constantly seeking personal and professional growth. As a result, coaching programs have gained popularity for their ability to guide and empower people to reach their full potential. Whether you are an experienced coach looking to establish a new program or an individual with a passion for helping others, creating a successful coaching program requires careful planning and thoughtful execution. If you’re new to coaching, you may be wondering where to start. Like everything, there are many different ways to do things. In this guide, I’m going to break it down for you and will show you a step-by-step guide to creating a coaching program.


Define Your Purpose and Target Audience

Before diving into the details of your coaching program, it’s crucial to identify your program’s purpose and the specific group of individuals you’re trying to help. Defining a clear purpose will help you stay focused on your goals, while understanding your target audience will allow you to tailor your coaching approach to meet their unique needs.


Ask yourself the following questions:


  • What’s the core mission of your coaching program?
  • Who are the individuals you want to coach? Are they professionals, entrepreneurs, students, or individuals seeking personal growth?
  • What challenges or issues does your target audience face, and how can your coaching program address them effectively?
  • What is the problem they need solved?
  • What transformation are they looking for?


Establish Your Coaching Methodology and Approach

Once you have a clear understanding of your purpose and target audience, it’s time to establish your coaching methodology and approach. Your coaching methodology refers to the overall principles, techniques, and tools you’ll use to guide your clients toward their goals.


Consider the following aspects:

  • Choose a coaching style: Will your program be a 1:1 program, group coaching, a digital course, or a membership?  Often, if you’re just in the beginning of your coaching career, a 1:1 program is a great way to start. This allows you to take your time to develop, iron out any details, get feedback, tweak, and improve.


  • Develop a coaching framework: Design a step-by-step process that will take your clients from their current state to their desired outcomes. A well-structured coaching framework will provide clarity and direction to both you and your clients. Write down your outline of every topic and/or subtopic you want to discuss in your program. Write out, in detail, each of your topics, as if you’re writing a script or blog post.  Consider adding resources such as worksheets, checklists, prompts, etc., that will support the understanding or practice of the topic.


  • Define coaching sessions: Determine the frequency, duration, and format of your coaching sessions. Will they be conducted in-person, over Zoom, or through online platforms?


Acquire the Necessary Skills and Knowledge

As a coach, you play a pivotal role in the success of your clients. Therefore, it’s essential to invest in your own personal development and acquire the necessary skills and certifications to become a competent and effective coach. Schedule education and learning into your daily, weekly, monthly, and annual calendars. Knowledge is power, and this will increase your value.


  • Get certified: Consider enrolling in reputable coaching certification programs accredited by recognized coaching bodies. These certifications validate your expertise and build trust with potential clients.

  • Enhance your communication skills: Effective communication is at the core of coaching. Work on improving your active listening, questioning, and feedback-giving skills to create a supportive and non-judgmental coaching environment.

  • Develop empathy and emotional intelligence: Empathy and emotional intelligence are crucial for understanding and connecting with your clients on a deeper level. Practice empathy and self-awareness to create a safe space for your clients to share their challenges and emotions. Remember: it’s as much about the experience as it is about the value you’re offering.

Design Tailor-Made Coaching Programs

One size does not fit all when it comes to coaching. Each individual has unique needs and goals, and it’s essential to create tailor-made coaching programs that cater to those specific requirements. With that being said, it’s essential to test, test, test! Be open to feedback and constructive criticism.

  • Get to know your clients: Before starting your coaching program, get to know each of your clients. This will help you identify their strengths, weaknesses, and areas of improvement. You can do this through intake forms, questionnaires, or onboarding calls.

  • Set achievable goals: Collaborate with your clients to set goals. This will ensure clarity and direction throughout the coaching journey. When we know our clients’ goals, we’re more intentional with the road maps we create in our programs.

  • Create action plans: Based on the needs assessment and the established goals, develop personalized action plans that outline the steps your clients need to take to achieve their objectives. These action plans may look like checklists, timelines, workbooks, etc.

Establish a Supportive Coaching Environment

One size does not fit all when it comes to coaching. Each individual has unique needs and goals, and it’s essential to create tailor-made coaching programs that cater to those specific requirements. With that being said, it’s essential to test, test, test! Be open to feedback and constructive criticism.


  • Get to know your clients: Before starting your coaching program, get to know each of your clients. This will help you identify their strengths, weaknesses, and areas of improvement. You can do this through intake forms, questionnaires, or onboarding calls.


  • Set achievable goals: Collaborate with your clients to set goals. This will ensure clarity and direction throughout the coaching journey. When we know our clients’ goals, we’re more intentional with the road maps we create in our programs.


  • Create action plans: Based on the needs assessment and the established goals, develop personalized action plans that outline the steps your clients need to take to achieve their objectives. These action plans may look like checklists, timelines, workbooks, etc.

Implement Evaluation and Feedback Opportunities

As a coach, it’s essential to continuously evaluate the effectiveness of your coaching program and seek feedback from your clients. This will enable you to make necessary improvements and ensure that your coaching program remains relevant and impactful.

  • Conduct regular assessments: Periodically evaluate your clients’ progress toward their goals. Assess their growth and development to determine the effectiveness of your coaching methods. Your program will evolve, and this tool will help you improve your coaching. 

  • Seek client feedback: Encourage your clients to provide feedback on their coaching experience. Listen to their suggestions, and use the feedback to enhance your coaching program.

  • Adapt and improve: Be open to making adjustments to your coaching program based on the evaluations and feedback received. Continuous improvement is key to staying ahead in the coaching industry.

Creating a coaching program is a rewarding endeavor that requires dedication, passion, and a commitment to helping others achieve their full potential. By defining your purpose, understanding your target audience, and developing a strong coaching methodology, you can establish a transformative coaching program that makes a lasting impact on the lives of your clients. Remember, coaching is not just about imparting knowledge; it’s about empowering individuals to unlock their inner potential and thrive in all aspects of life. Embrace your role as a coach with empathy, compassion, and continuous learning, and you’ll be well on your way to building a successful and fulfilling coaching program.

How to Edit Videos on Your iPhone

How to Edit Videos on Your iPhone

Brittni Schroeder Coaching

How to Edit Videos
on Your iPhone

How to Edit Videos on Your iPhone


In today’s digital age, creating and sharing videos has become an essential part of our lives. It’s not as hard as you would think to learn how to edit videos on your iPhone. With all the amazing technology, editing videos on your iPhone isn’t just possible — it’s also surprisingly easy.  Whether you’re a social media enthusiast, a vlogger, or an entrepreneur, this guide will walk you through the steps of editing videos on your iPhone like a pro. If you don’t use an iPhone, that’s okay, any smart phone will work! I will show you how to edit videos on your iPhone in this post. 


Choose the Right Video Editing App

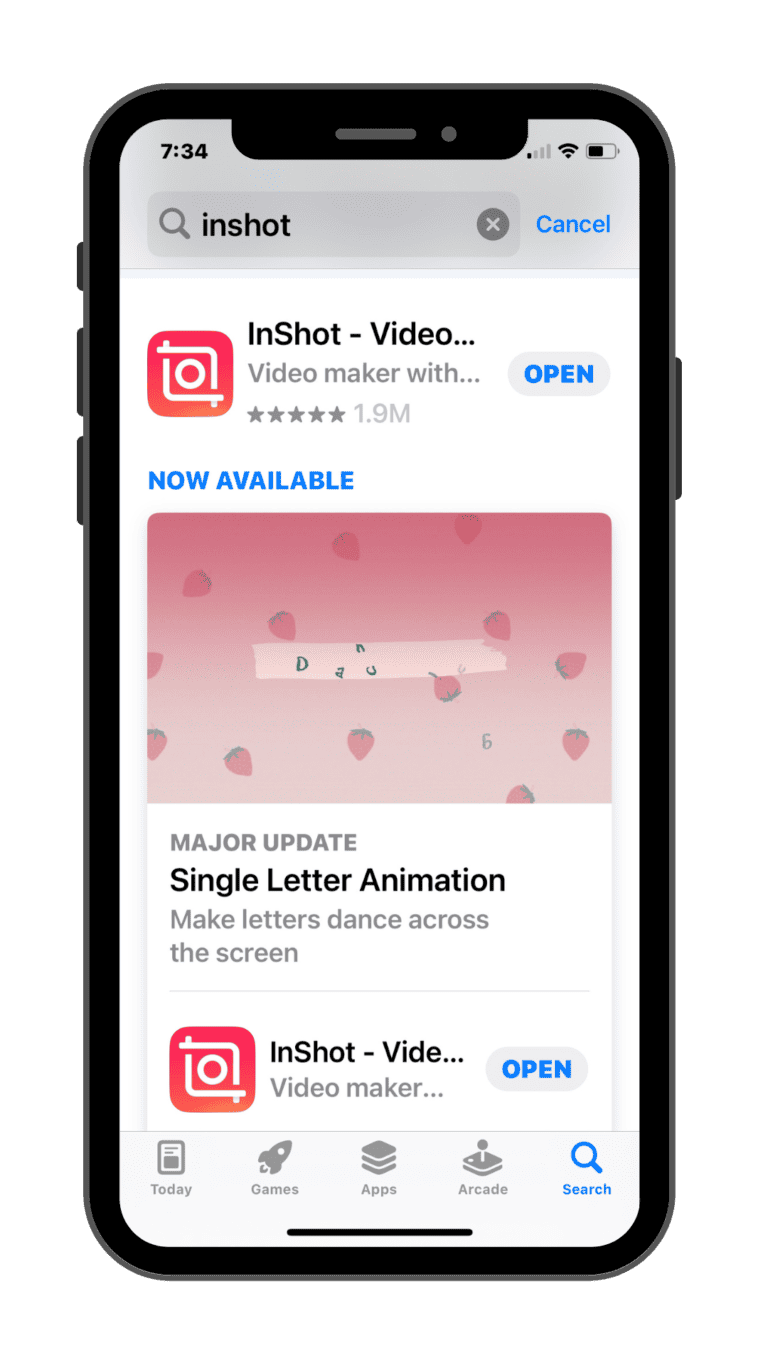
The first step to editing videos on your iPhone is to select the right app from the App Store. There are so many excellent video editing apps available, such as iMovie, Adobe Premiere Rush, and InShot. 


These apps offer a range of features for many different skill levels and let you generate many of the same effects. My app of choice is InShot, but like I mentioned, you can’t go wrong with many of the other ones.


How to Edit Videos on Your iPhone

Import Your Video Clips

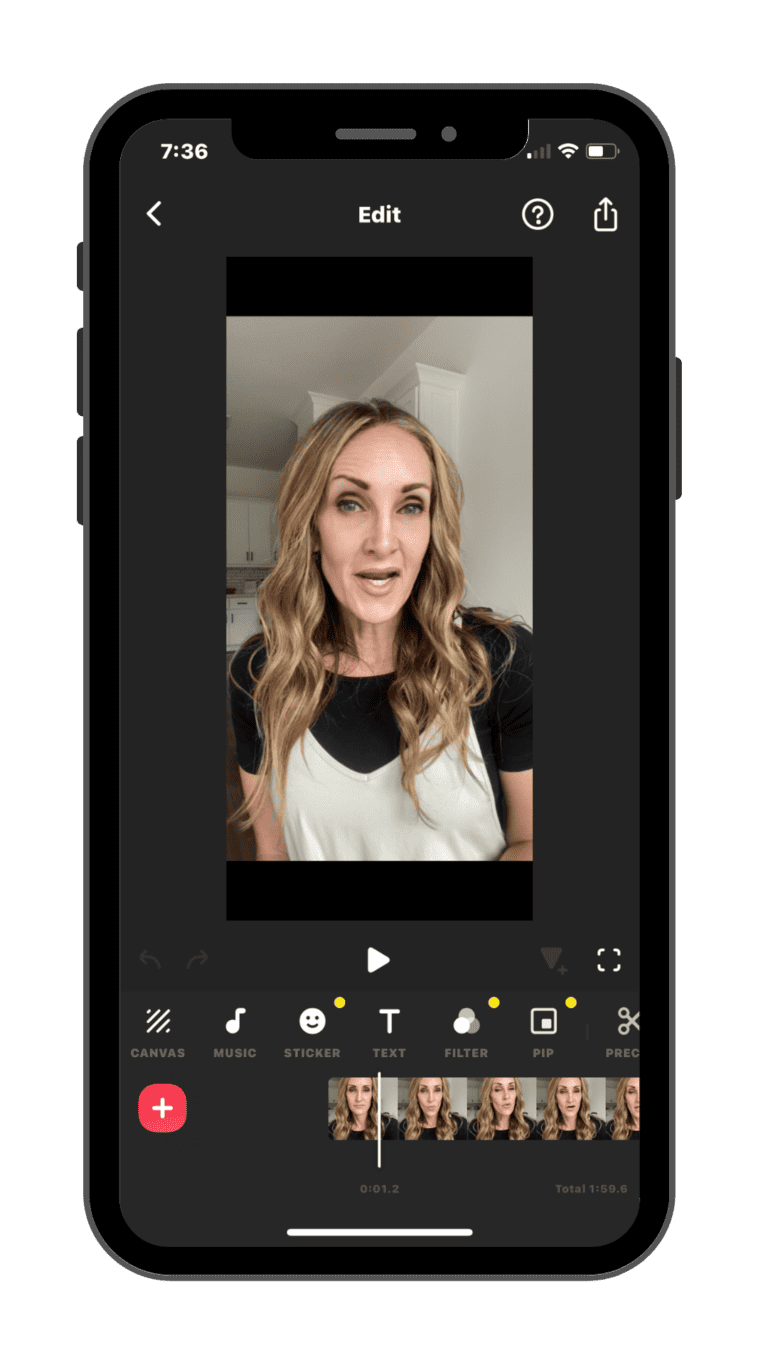
Once you’ve selected your preferred video editing app, it’s time to import your video clips and start a project. Most apps allow you to import videos directly from your camera roll. Once you’ve imported your video, it’s time to get creative.

How to Edit Videos on Your iPhone

Trim and Cut Clips

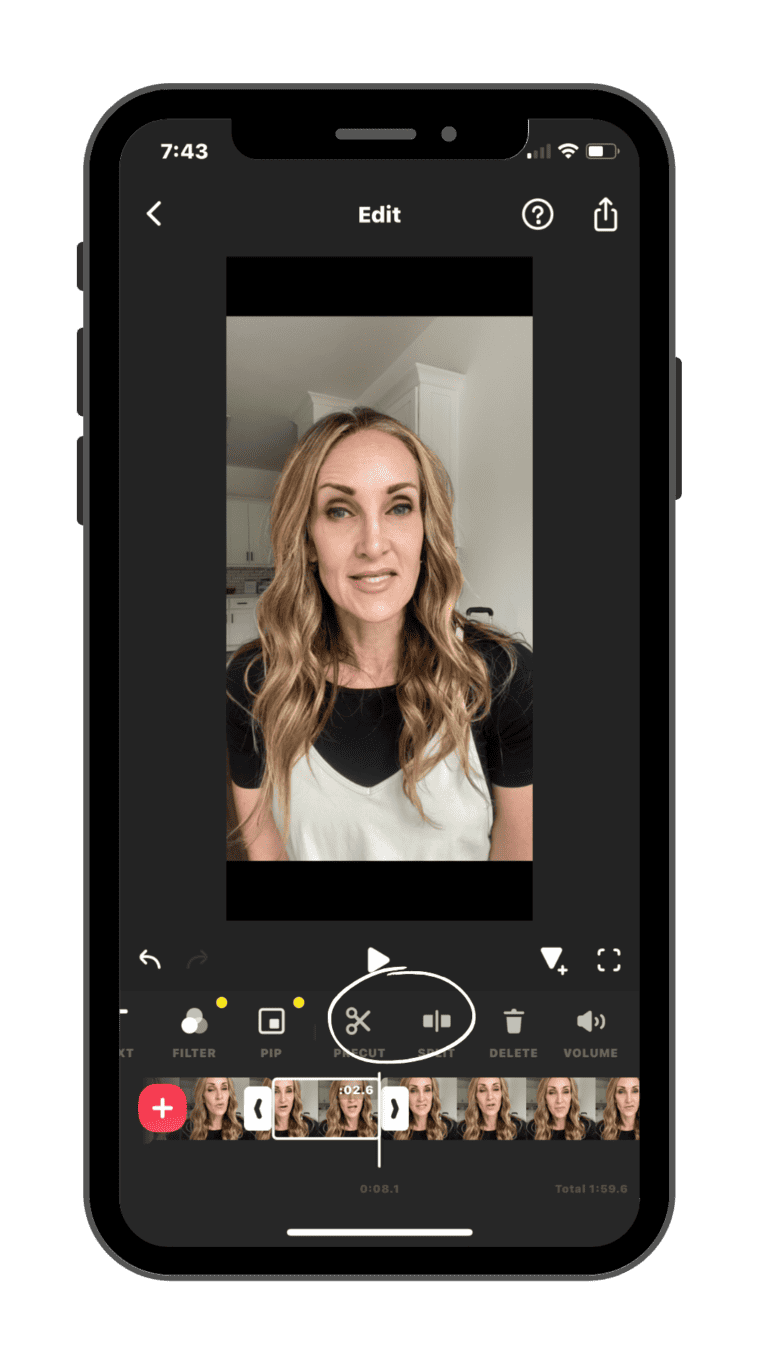
Trimming and cutting unnecessary footage is the first step to creating video. You want your audience to stay engaged, so you will want to cut out or trim your video so it flows. Use the app’s editing tools to trim the beginning or end of a clip, or cut out specific sections that you don’t want to include in your final video.

How to Edit Videos on Your iPhone

Add Transitions and Effects

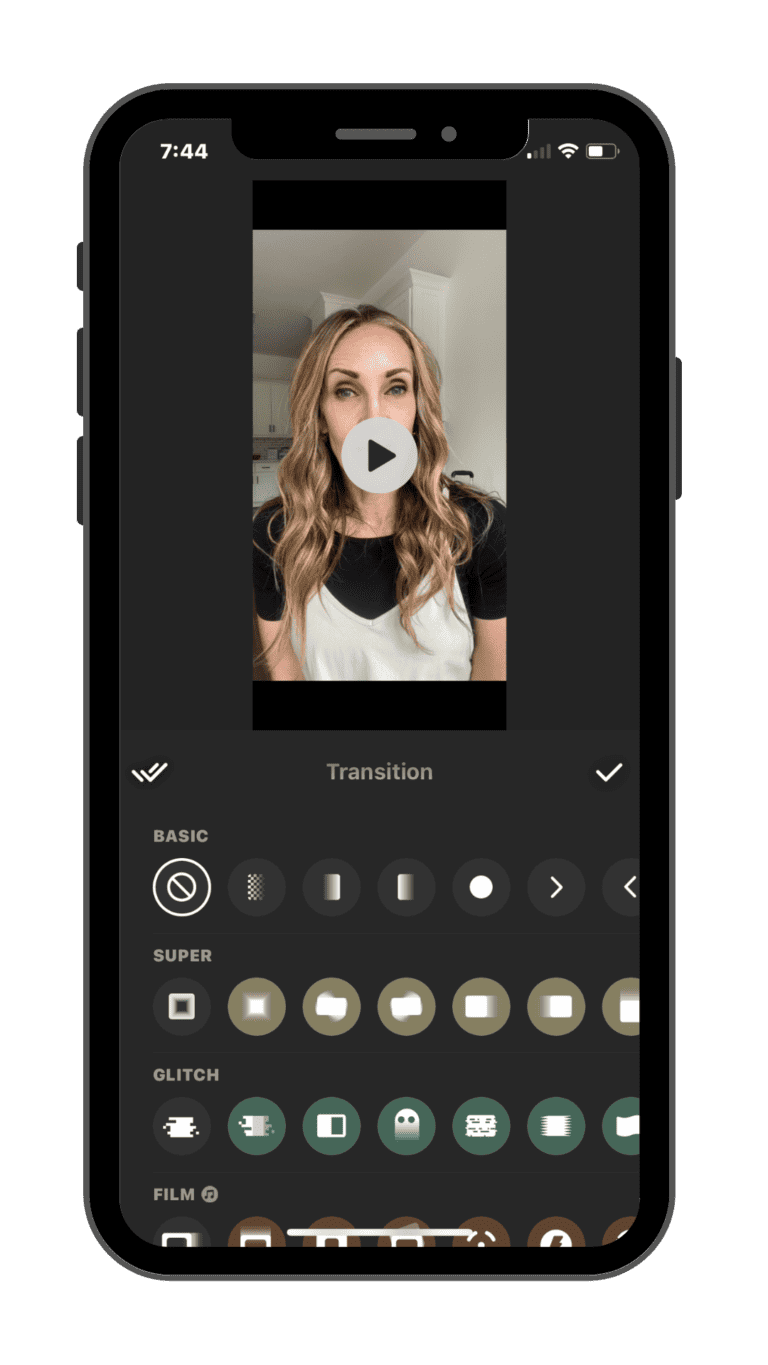
Level up your video by enhancing the visual appeal. You can do this by incorporating transitions and effects. Transitions smooth out the flow between different clips, while effects can add features, overlays, or visual enhancements.

How to Edit Videos on Your iPhone

Add Background Music and Audio

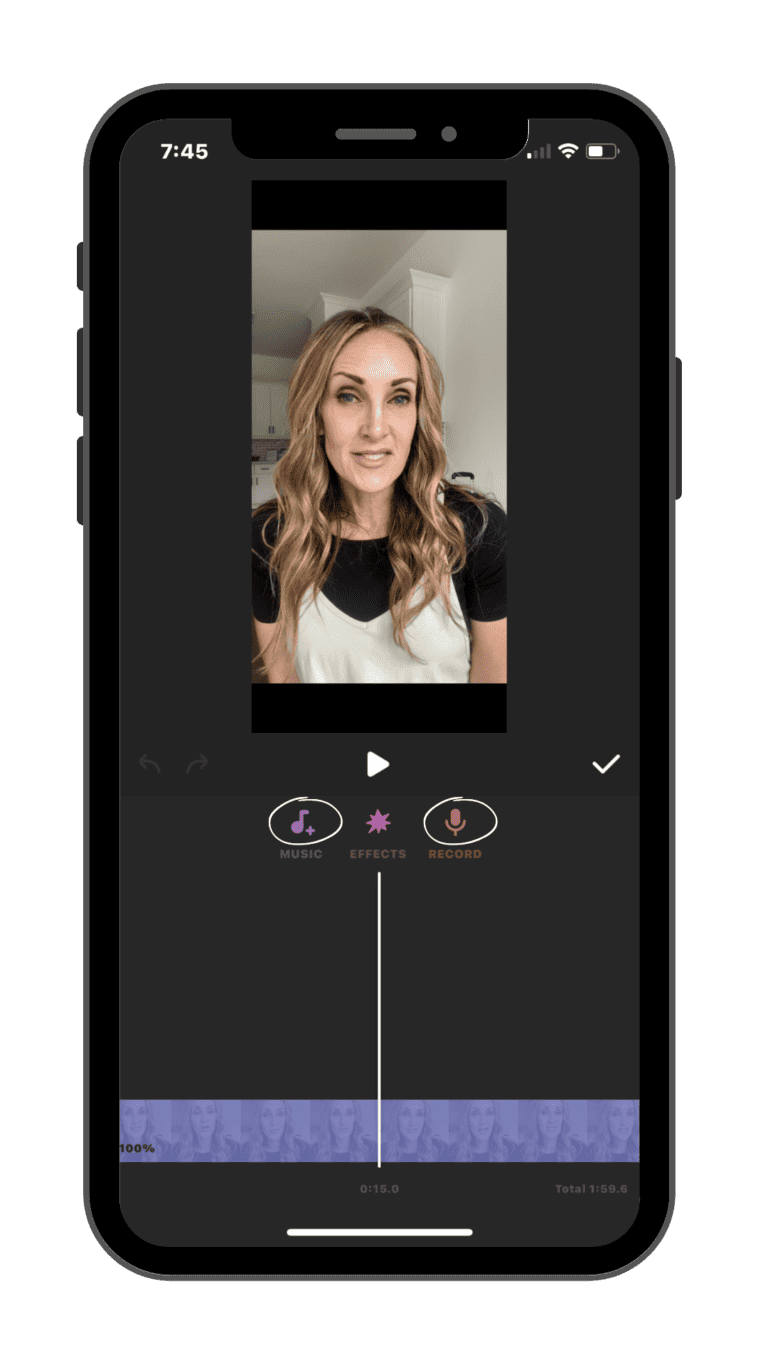
A catchy, well-chosen background music track can create the mood and increase the impact of your video. Some video editing apps provide access to royalty-free music libraries, allowing you to find the perfect soundtrack for your content. If you’re posting on social media, it might be a good idea to use the music they provide so you don’t risk having your content taken down for violating copyright laws.

How to Edit Videos on Your iPhone

Additionally, you can include voiceovers or sound effects to add context and depth to your video

Utilize Text and Titles

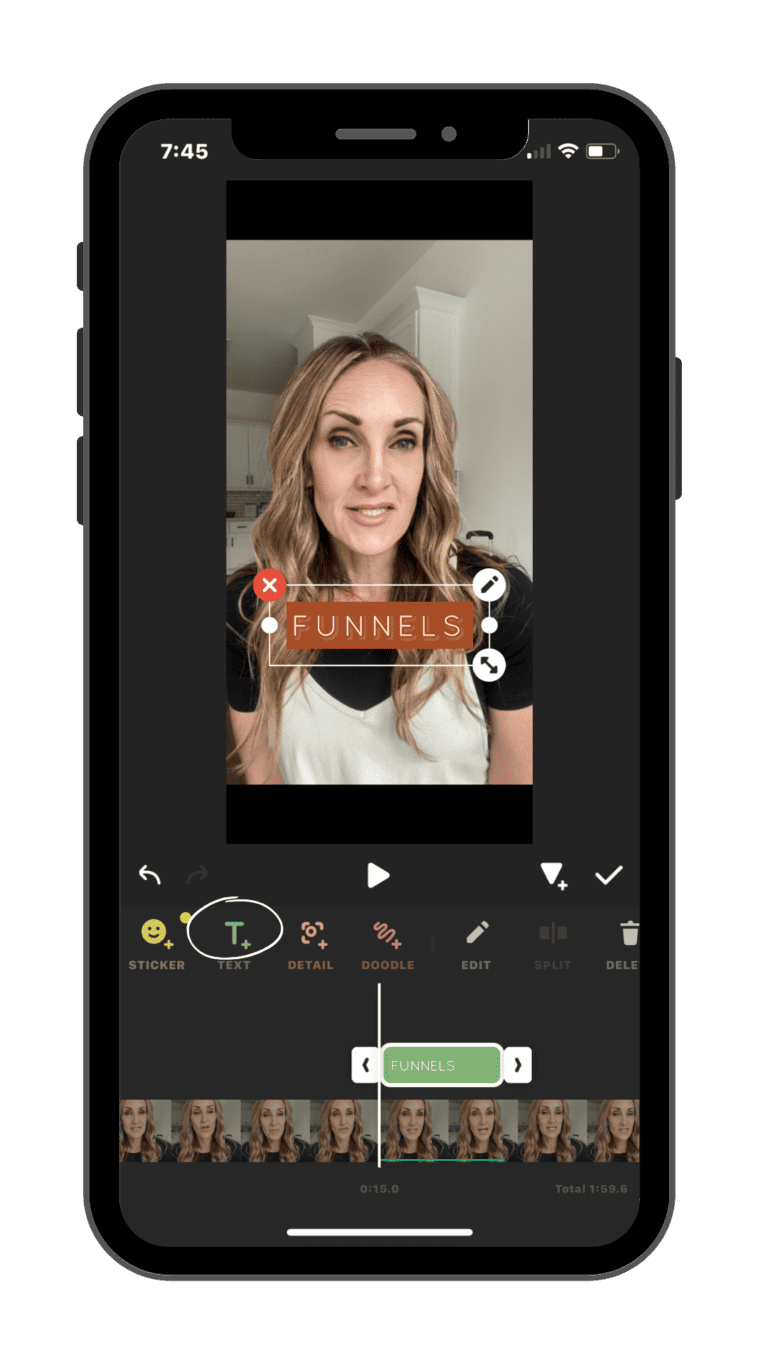
To convey information effectively or add context to your video, utilize text and titles. Include hooks, titles, subtitles, or closed captions to personalize your content. Including text and titles not only keeps your audience’s attention, but it also lets people who may be scrolling on social media in a public place receive your message even if they have the sound turned off.

How to Edit Videos on Your iPhone

Adjust Video Speed

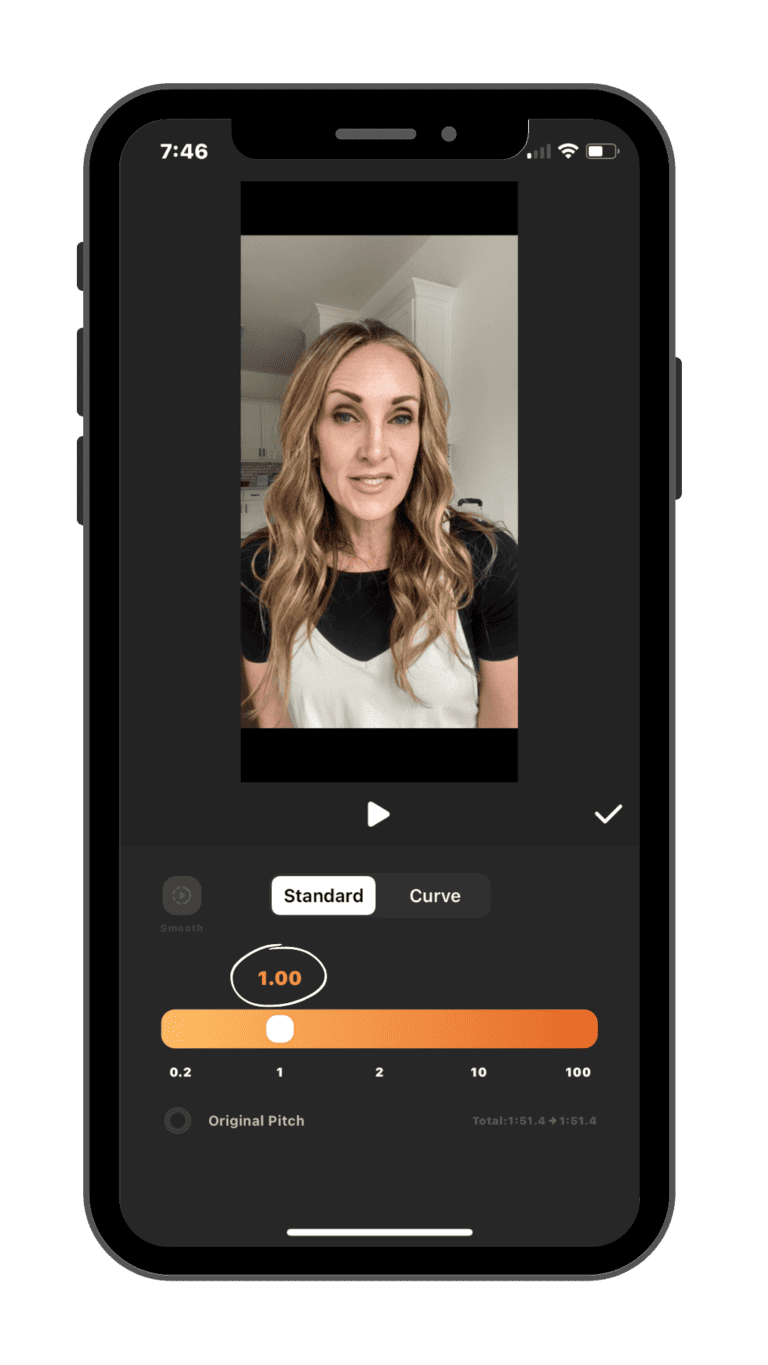
Experiment with video speed adjustments to create captivating effects. This is one of my favorite features when I’m creating tutorials. You can slow down or speed up specific clips for dramatic emphasis or artistic purposes..

How to Edit Videos on Your iPhone

Apply Color Correction and Filters

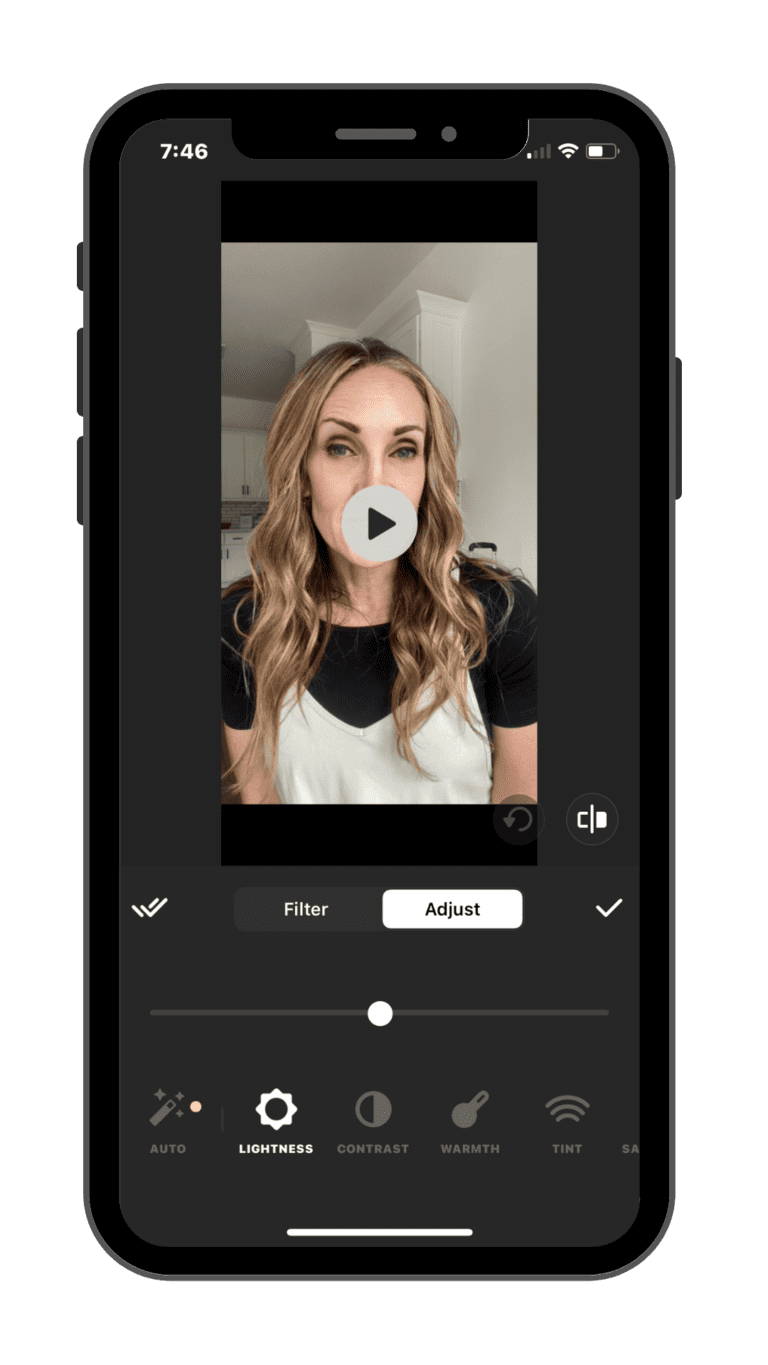
Improve the overall look of your video by using color correction tools and filters. Adjust brightness, contrast, saturation, and other settings to achieve the desired visual style.

Remember to use these features in moderation –– sometimes less is more, if you know what I mean. If you use filters, remember your goal is to enhance and improve, don’t overdo it. 😜

How to Edit Videos on Your iPhone

Save and Export

Once you’re satisfied with your video, save the project and export it in your preferred video resolution and format. Most apps allow you to share the final video directly to social media platforms or save it to your camera roll for later sharing.

I prefer to save mine to my camera roll and repurpose it to different platforms.

Editing videos on your iPhone has never been easier or more accessible. With the right video editing app and a little creativity, you can turn your raw footage into captivating content that resonates with your audience. Whether you’re a seasoned videographer or just getting started,  you have the tools and potential of video editing on your iPhone and take your storytelling to the next level. When you know how to edit videos on your iPhone you can create amazing content. Happy editing!

5 Essential Weekly Tasks to Grow Your Online Business

5 Essential Weekly Tasks to Grow Your Online Business

Brittni Schroeder Coaching

5 Essential Weekly Tasks to
Grow Your Online Business

5 Essential Weekly Tasks to Grow Your Online Business

Building a successful online business requires consistent effort and strategic planning. While daily tasks contribute to the day-to-day operations, there are several key weekly activities that can significantly boost the growth of your online business. In this blog post, we’ll discuss 5 essential weekly tasks to grow your online business, when performed consistently.


Weekly Task 1: Review and Analyze Performance Metrics

Take the time each week to review and analyze the performance metrics of your online business. This includes analyzing website traffic, conversion rates, social media engagement, email marketing metrics, and sales data. By gaining insights into what’s working and what needs improvement, you can make informed decisions and refine your strategies accordingly. Tools like Google Analytics, social media analytics, and email marketing platforms provide valuable data to monitor your business’s progress and identify areas of opportunity.


Analytics can be very telling as to what is and isn’t working. With that being said, it’s important to test different strategies. When trying a new strategy, give yourself a realistic length of time to test so you have enough data to determine if you’re getting a return on your investment or time. Depending on what you’re testing, it could take 6-12 months to get an accurate determination of your data.


Weekly Task 2: Content Creation and Marketing

Content is king in the online world, and consistent creation and marketing of high-quality content can drive significant growth for your business. Set aside dedicated time each week to create valuable blog posts, videos, podcasts, or other forms of content that resonate with your target audience. Focus on providing solutions, educating, entertaining, or inspiring your audience. Once you’ve created the content, develop a comprehensive marketing plan to distribute it across relevant channels, such as your website, social media platforms, email newsletters, and guest posting opportunities. Engage with your audience, and encourage sharing and interaction to expand your reach.


I’ve found that having designated days and/or times to create content is very effective. For example, Monday is social media content creation day, Tuesday is podcast day, Wednesday is blog day, and Thursday is Pinterest day. Dedicating one hour on those days allows me to create a lot of content, and then I’m able to show up consistently with valuable information.


Weekly Task 3: Engage with Your Audience

Building strong relationships with your audience is vital for the long-term success of your online business. Allocate time each week to engage with your audience across various platforms. Respond to comments, messages, and emails promptly, and foster conversations by asking questions or seeking feedback. Actively participate in relevant online communities and forums where your target audience hangs out. By consistently engaging with your audience, you can cultivate trust, loyalty, and brand advocates who will support your business and spread the word.

Weekly Task 4: Seek Collaborations and Partnerships

Collaborating with others in your industry can open new doors for your online business. Look for opportunities to form partnerships or collaborations with influencers, bloggers, complementary businesses, or industry experts. This can include joint promotions, guest blogging, co-creating content, or hosting webinars together. Collaborations can help you tap into new audiences, increase brand exposure, and establish your expertise in the field. Reach out to potential partners, and explore mutually beneficial opportunities that align with your business objectives.


Creating great relationships with your colleagues can be the catalyst to your growth. Look for collaborations with those who align with your core values. Take the time to get to know possible collabs before you jump into a partnership. Working together with someone can be amazing, but it also can backfire and not end well if you’re not compatible.


Weekly Task 5: Continuous Learning and Professional Development

The online business landscape is ever-evolving, and it’s crucial to stay updated with the latest trends, strategies, and technologies. Set aside time each week to invest in your own continuous learning and professional development. Read industry blogs and books, and attend webinars or online courses related to your niche. Stay abreast of changes in search engine algorithms, social media algorithms, and emerging technologies. By staying informed and adapting to the changing landscape, you can make informed decisions and keep your online business ahead of the curve.

Look for programs or courses that complement your business and knowledge. Knowledge is power, and the more you know, the more valuable you become. Make it a point to schedule education into your weekly workflow. 

Growing your online business requires consistent effort and a proactive approach. By incorporating these five weekly essential tasks into your routine, you can enhance your business’s growth potential. Regularly reviewing performance metrics, creating and marketing valuable content, engaging with your audience, seeking collaborations, and investing in continuous learning will help you stay on track and achieve long-term success in the competitive world of online business. Stay committed, stay focused, and watch your business thrive.

Building a Profitable Online Coaching Business

Building a Profitable Online Coaching Business

Brittni Schroeder Coaching

Building a Profitable
Online Coaching Business

Building a Profitable Online Coaching Business

As a business coach in the online world, your expertise lies in helping others achieve their goals and transform their lives. But to make a significant impact and create a sustainable coaching business, you need to focus not only on your clients’ success but also on building a profitable online coaching business for yourself. In this blog post, we’ll explore essential strategies, tips, and advice on establishing and growing a successful coaching business in the online space. We’ll cover key areas such as finding and narrowing your niche, pricing your services, setting up effective marketing funnels, and attracting clients.


Let’s dive in!


Finding Your Niche

One of the first steps in building a profitable coaching business is identifying your niche. Narrowing your focus lets you position yourself as an expert in a specific area, making it easier to attract your ideal clients. Reflect on your passions, skills, and experiences, and consider the unique problems you can solve for your target audience. By specializing in a specific niche, you can differentiate yourself from competitors and create a strong personal brand.


It’s true when they say the riches are in the niches. When you become the expert in your field, clients are willing to pay top price for the best of the best. If someone has a problem they won’t solve and you can get them the results, that increases your value as a coach.


PRICING YOUR SERVICE

Determining the right pricing strategy for your coaching services is crucial for profitability. It’s essential to strike a balance between providing value to your clients and ensuring that your pricing reflects your expertise and the transformation you offer. Don’t undervalue your worth, but also be mindful of pricing yourself out of your target market.


Take the time to do your own market research. Find out what your competition is charging, consider your experience, determine what you offer that others don’t, and identify the need. These factors will help you determine where to start your pricing.


Setting up Effective Marketing Funnels

Marketing funnels play a vital role in attracting and converting potential clients into paying customers. Start by identifying your target audience and understanding their pain points and desires. Develop compelling and valuable content that speaks directly to your audience’s needs. Leverage various online channels such as social media, blogging, podcasts, and videos to create awareness and engage with your target market. Offer lead magnets, such as free ebooks or webinars, to capture email addresses and build your subscriber list. Utilize email marketing to nurture leads and guide them through your funnel, showcasing the value of your coaching services and ultimately converting them into clients.

Take the time to understand your analytics so you can determine what is and isn’t working in your funnels. When you understand the way funnels work, your marketing efforts will be more effective.


Attracting Clients

To build a profitable coaching business, you must focus on consistently attracting clients. Aside from marketing funnels, consider these strategies:


  • Networking: Attend industry events, join online communities, and engage with potential clients and peers. Build relationships and establish your credibility as a trusted coach.
  • Referrals: Encourage satisfied clients to refer you to their network. Offer incentives or referral programs to incentivize word-of-mouth marketing.

  • Collaborations: Partner with complementary service providers or influencers in your niche to expand your reach and tap into their audiences.

  • Thought Leadership: Establish yourself as a thought leader by creating valuable content, publishing guest posts on industry platforms, or hosting webinars and workshops. This positions you as an authority and attracts clients seeking your expertise.

When you’re consistently and intentionally driving traffic to your marketing funnels and have effective funnels, you’ll see massive growth in your business.


Building a profitable coaching business in the online space requires careful planning, thoughtful execution, and a commitment to providing value to your clients. By finding your niche, pricing your services strategically, setting up effective marketing funnels, and actively attracting clients, you can position yourself for long-term success. Remember, building a profitable coaching business takes time and consistent effort, so stay focused, adapt to changes, and always prioritize the success of your clients. Now, go forth and create an impactful and profitable coaching business that transforms lives while fueling your own success!